Pressing is an important step when sewing. It’s essential to press at each stage during construction to ensure a perfectly finished garment. Keep your pressing equipment close to your sewing machine to remind yourself to press after each step. When you press your material, you should move the iron very little when it is in contact with the fabric.
Press in the direction of the fabric grain and each stitched seam before crossing with another. Make sure to press on the wrong side of the fabric to prevent iron shine. Below are some basic and extra pressing tools.
Steam/spray iron – choose an iron that has a wide variety of heat settings to accommodate for different fabric types. You should be able to use the iron and steamer on any temperature setting.
Tailor’s ham – used when pressing shaped areas such as curved seams, bust darts, collars or sleeve caps. The ham is a hard packed cushion with rounded curves. One side is cotton while the other is covered with wool to retain more steam. This pressing tool makes it easier to shape garment pieces when pressing seams.
Press cloth – used to prevent iron shine and is used when applying fusible interfacing. The cloth is transparent which allows you to see if the fabric is smooth or if the interfacing is properly aligned. It is also useful for using iron-on products.
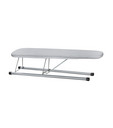
Sleeve board – looks like a miniature ironing board. It is used when pressing seams and details of small or narrow areas such as sleeves, pant legs, necklines and sleeve caps.
Point presser/clapper – made from hardwood and is used for pressing seams open in corners and points. The clapper flattens seams by holding steam and heat in the fabric. This tool is used in tailoring to achieve a flat finish and sharp edges on hard-surfaced fabrics.
Seam roll – is a firmly packed cylindrical cushion for pressing seams. The bulk of the fabric falls to the sides and never touches the iron, preventing the seam from making an imprint on the right side of the fabric.


